Creating a landing page is an essential element for any business owner or marketer to drive more traffic to their site and convert that traffic into potential leads or customers. A well designed landing page can help in promoting a specific product or service and provide the necessary information that the visitor is looking for, which can increase the chances of a conversion. If you’re using WordPress, creating a landing page is quite simple, and we’ll show you how.
What Is a Landing Page?
A landing page is a specific type of webpage with a clear and concise purpose: to achieve a single goal. This goal may be to sell a product or service or to gather contact information from potential customers. The primary focus of a landing page is to motivate visitors to take action, whether it be to make a purchase, subscribe to a newsletter, or fill out a form.
When used effectively, a landing page can be a highly effective marketing strategy. It serves as both a means of attracting traffic to a website and a powerful tool for converting visitors into customers or leads. By providing a focused and compelling message that speaks directly to the needs of the target audience, a well-designed landing page can help businesses achieve their marketing objectives and drive growth.
To reach your target audience and convert them into leads or customers, you first need to create marketing campaigns using various platforms such as paid ads, social media, emails, etc. These campaigns should include links that direct visitors to your landing page.
To ensure a higher conversion rate, it’s important to have a well-designed landing page that is specifically focused on achieving the desired goal. Compared to other pages on your website, landing pages are much better at converting visitors into leads or customers.
Since the main objective of a landing page is to increase customer conversion rates, it’s essential to create an attractive and engaging page. Properly designing and organizing the various call-to-action elements, such as the buy button, signup forms, and play media button, is crucial to the success of the landing page. By doing so, you can make it easy for visitors to take action and ultimately achieve your desired conversion goal.
How To Create A Landing Page in WordPress
With the help of a WordPress landing page plugin, creating a landing page in WordPress can be a simple process even for those who aren’t developers. By using a plugin, you can create a high-converting landing page that can help boost your website traffic and sales.
There are many different WordPress landing page plugins available on the market, but not all are created equal. In this tutorial, we’ll be using SeedProd, which is widely regarded as the best WordPress landing page plugin currently available.
With SeedProd, you can easily create a landing page using its drag-and-drop builder, which is straightforward to use, even for beginners. The plugin also offers hundreds of professionally designed templates and pre-made landing page blocks to help boost your conversion rates.
So, let’s take a step-by-step look at how to create a WordPress landing page using SeedProd.
Step 1: Install and Activate the SeedProd Plugin
To create a landing page using SeedProd, the first step is to visit their website and purchase the plugin. Once you’ve made the purchase, you can download the plugin file to your computer and copy the license key. Alternatively, you can try the free version of SeedProd, which is available for download from the plugin setting of your WordPress dashboard.
Next, log in to your WordPress dashboard and install the plugin. If you’re unsure how to do this, you can follow our step-by-step guide on installing a WordPress plugin. Once the installation is complete, remember to activate the plugin.
After activating the plugin, enter the license key on the welcome page. Paste the license key that you copied from your account on SeedProd’s website and click the “Verify Key” button.
Once the license key is verified, scroll down the page and click on the “Create Your First Page” button. This will take you to the SeedProd dashboard where you can start creating your landing page.
Step 2: Make Your Landing Page With SeedProd
When you access the SeedProd dashboard, you will see five different types of pages that you can create. At the top of the page, you will find options for coming soon mode, maintenance mode, login page, and 404 page.
Just below those options, you will see the button for creating a landing page. Click on the + Add New Landing Page button to start.

After clicking the button, you will be prompted to choose a landing page template. SeedProd offers a wide range of templates, including Sales, Webinar, and Lead Squeeze templates that are ideal for sales and marketing purposes. You can select a blank template if you wish to start from scratch.
To use a template, hover over it and click the checkmark button.
The next step is to customize the template with your own content.
Step 3: Customize Your Template
Once you’ve selected your desired landing page template, you’ll be directed to SeedProd’s visual drag-and-drop builder where you can personalize your landing page to fit your needs.
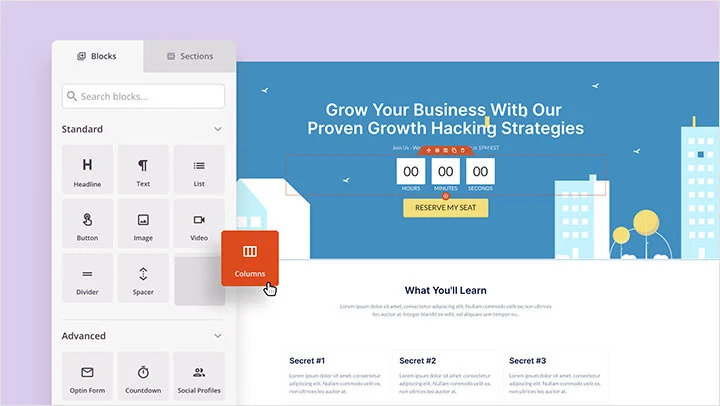
On the left side of the builder, there are landing page blocks and sections that you can add to the template. On the right side, you can preview your changes live.
Customizing the landing page template is easy, as you can adjust each element by simply clicking and pointing on it. You can change the text, color, style, layout, and alignment to match your brand. Similarly, you can also change the background color and images used in the template to align with your brand colors and images. To do this, click on the Global Settings button in the bottom left corner.
If there are blocks that are not useful to your landing page, you can remove them by clicking on the trash can icon upon hovering. You can also duplicate a content block, move it, change its settings, or save the block.
In addition, you can easily add new blocks such as buttons, opt-in forms, contact forms, social profiles, and more to your landing page template. To add new content, drag a landing page block from the left side of the screen and drop it onto your landing page wherever you wish to place it.
For instance, you can add a countdown timer to create a sense of urgency.
To customize any new block that you have added to your page, simply click on it to edit the text, style, alignment, and more.
Once you’re happy with the changes you’ve made to your landing page, click the Save button on the top right corner to finalize and save your work.
Step 4: Connect Your Email Marketing Platform
If you’ve incorporated an opt-in form into your landing page to gather leads and build your email list, it’s important to connect it to your email marketing service.
Firstly, navigate to the top of your screen and select the Connect tab. SeedProd is compatible with various email marketing platforms such as Constant Contact, Getresponse, and many others.

Next, locate your email service from the provided list and click on Connect New Account. Follow the simple instructions to authenticate and link your account.
Afterward, whenever a user submits their email address via your landing page opt-in, it will be immediately added to your email list without any further action from you.
Step 5: Publish!
It’s now time to launch your landing page on your WordPress website. To make it public, simply click on the dropdown arrow located beside the Save button, and select Publish.
Once the Publish option is selected, SeedProd will display a success message to indicate that your page is now live and accessible.
To view your newly launched landing page, click on the See Live Page button. You can now see your landing page and make necessary adjustments to optimize its performance.
That’s all it takes to create a stunning WordPress landing page using SeedProd’s intuitive 5-step process. This plugin is undeniably the best option for building professional-grade WordPress landing pages.


How To Create A Landing Page In WordPress